Today we live connected to electronic devices such as mobile phones,tablets, or laptops. We constantly use small and large appliances that spend a lot of time plugged into the mains.
Whether for cleaning, personal care or our leisure, all these devices have one thing in common, they need to be connected to work or recharge their drums.
As we are continually putting in and taking out these devices, it may end up breaking, overloading or overheating the Plug. In addition, it is advisable to check their status from time to time, after all, you are in contact with them every day.
As soon as you find a crack, break or deterioration (it may be deformed, with a strange color, or it may even come off) , change the plug as soon as possible for your safety.
Even if you think it is complicated or dangerous, to replace a socket outlet with a new one, you simply have to have a specific electric screwdriver .
This may be the first time you change one, don’t worry, here we will explain how to put a Plugin your home or premises step by step.
Quick guide to put a plug in the house
Follow these tips and in less than you can imagine you will have to use the new plug.
plug parts
These objects are the most significant part of the electrical installation of a house. Before you remove anything or start using the screwdriver, you have to know what parts a conventional plug has.

On the one hand, there is the socket frame . It is the external casing, the box that you see and that is glued to the wall placed under pressure.
The central cover is another element that you can see with the naked eye. The trim or “cover” of the mechanism that has the holes to insert the plugs of your mobile charger, for example.
Some models integrate the frame and the trim in the same piece and are integrated into the plug itself. This cover protects and hides the electrical mechanism.
It is fixed with screws to the wall so that it does not fall when you hit it or when you disconnect the device.
The other important part is the important mechanism . This is the base and the inside of the plug. So that we understand each other, the metallic structure where all the cables are connected.
How to differentiate the cables?
To know how you have to replace a wall plug in your home, the first thing is to identify all the components that are under the plastic that makes it “beautiful”. It is much simpler and safer than you imagine.
Those that are green or yellow are grounded. This cable serves as a protection as it prevents the stream pass people. Basically it is because electricity does not “run” inside it and thus we avoid problems with a bad contact.
The color blue identify the neutral wire . This allows the current to circulate by placing itself in the hole at the top with a letter “N” (for neutral).
Lastly, and most dangerous , we have the black, brown or gray cable . This is the phase wire. It is connected to the electrical current and therefore you must be extremely careful every time you handle it.
It is placed in a hole marked with the letter “L” line and is also located on top of the metal frame.
Steps to change a plug
Follow the instructions below to the letter to learn how to change a plug and do it safely.
cut off light
The first and fundamental step that you have to follow is cutting off the entrance of light. Do it by lowering the pilot of the frame general of your house. This ensures that the work you do is not in danger.

Replace a plug with a new one
This process is simple, but we are still going to specify everything you have to do.
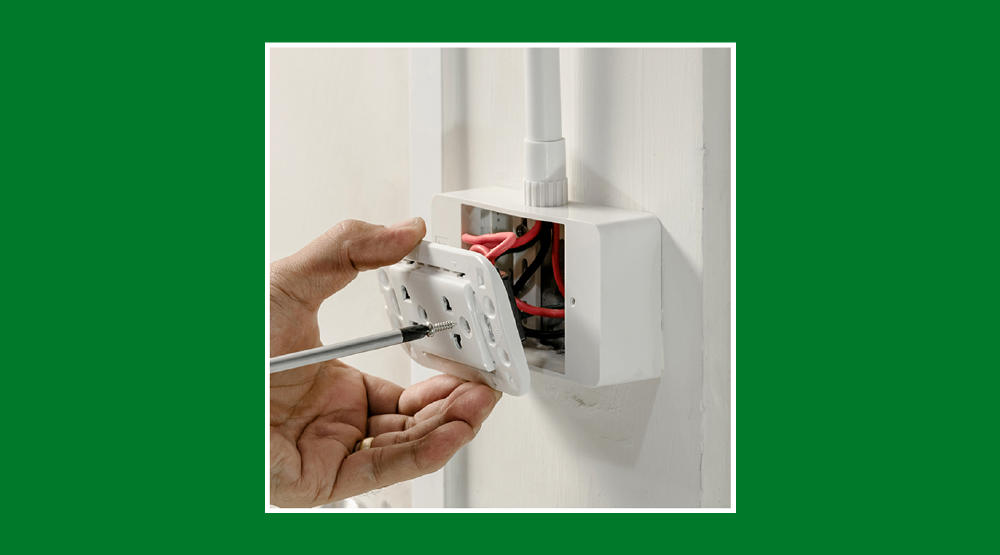
remove the plug
Remove the mechanism cover , usually done by unscrewing the screw that is in the center when it is a single unit. You should also use a little leverage on the side.
Now remove the plastic trim if it is not integrated into the plug body.
Continue by removing the metal part from the base of the mechanism. It’s as simple as unscrewing the anchor points it has. For greater comfort it is best to do it with an electric screwdriver.
Disconnect the three wires leading to the plug. Both the blue of the neutral, the phase (either black, brown or gray) and the yellow or green of Earth.
Plug each one back into the respective terminals of the new plug. Depending on the model, it may be pressure or screwed.

Once this is done, put the cables and the mechanism in the box where the previous plug was. Secure the device with the two clamping screws. It is very important that no strands of the flexible cable break.
Make sure they all fit inside the terminal to avoid potential problems. They are necessary for the plug to work properly . In case you have a hard time inserting them, reinforce the end with cable tips.
Assemble the trims and the cover
Now it ‘s time to put the trims of the new plug and the cover of the new mechanism back, screw it and everything is ready for use again.

Reconnect the light input with the pilot light of the general panel and check that the new plug works perfectly. In the event that this is not the case and the device does not work or the automatic jumps, do not worry.
Unplug the light again and check every step of the connections . Make sure that each cable is in the corresponding terminal. If, however, the problem continues, check that the device you have connected works in another socket .
Check the condition of the cables again , as we pointed out before, at the moment that a filament breaks or any of the cables is damaged, it may jump the light to protect you.